Friday, March 30, 2012

Best Foundation Plants for Stellar Curb Appeal ... More Plants

Inkberry


(Ilex glabra) 'Compacta'
Look for slow-growing 'Compacta,' which has dark green leaves and a rounded shape, and grows to 4 feet high and 6 feet wide; Zones 5 to 9. 'Chamzin' will reach 3 feet high and 4 feet wide.


Japanese Yew

(Taxus cuspidata) 'Densa'
These are the shorter, slower-growing cultivars that are easiest to keep in check. Female 'Densa' has dark needles with red berries in winter. Can reach 4 feet high and 8 feet wide; USDA Hardiness Zones 4 to 8. Hybrid 'Wardii' is a slow grower that, in 20 years, can reach 6 feet high and 20 feet wide.


Deciduous Flowering Shrubs: Slender Deutzia

(Deutzia gracilis) 'Nikko'


Combine shrubs that bloom in early spring with those that continue to provide color into summer. Compact varieties stay neat in winter after their leaves have dropped.


Slender Deutzia is a mound of slender, flower-filled branches. 'Nikko' blooms in spring with white flowers and dark blue-green foliage. Can grow up to 2 feet high and 5 feet wide.


Smooth Hydrangea

(H. arborescens) Bella Anna


Place these showy, reliable bloomers under a window where you can enjoy them from inside. 'Annabelle' has white blooms in summer, while Bella Anna is covered in pink flowers until fall. Both grow up to 5 feet high and wide.


Japanese Dpirea

(Spiraea japonica) 'Anthony Waterer'


These long bloomers grow in upright mounds with pink or red flowers from late spring to early summer. 'Anthony Waterer' has pinkish-red blooms and can grow up to 4 feet high and 6 feet wide.


Wednesday, March 28, 2012

Best Foundation Plants for Stellar Curb Appeal

Evergreen Shrubs: Rhododendron

'Yaku Prince'


These bones of a foundation planting provide structure to the flowering specimens around them. Slow-growing, dwarf, or compact varieties are a smart choice, especially under windows.


Rhododendron is a favorite for showy spring flowers and glossy green leaves; shorter varieties require less maintenance pruning to stay in check. 'Yaku Prince' blooms with funnel-shaped pink flowers and grows to 3 feet high and wide with olive-green leaves; Zones 4 to 8. Azalea 'Delaware Valley White,' a subspecies, has tubular white flowers and gets about a foot bigger


Littleleaf Boxwood


(Buxus microphylla) 'Winter Gem'


Among the more compact boxwoods, 'Green Velvet' has pale green leaves and a mounding habit that can grow to 4 feet high and wide; zones 5 to 8. 'Winter Gem' reaches a similar size but with yellowish-green leaves.


Japanese Pieris


(Pieris japonica) 'Cavatine'


Dense habit with branches that reach to the ground. 'Cavatine' has leathery, dark green leaves with bell-like white flowers in spring. Can grow to 3 feet high and wide.


Tuesday, March 27, 2012

Best Foundation Plants for Stellar Curb Appeal / Part 2

Tallest in Back, Shortest in Front


Put another way, a successful foundation planting starts with picking the right plants in the right proportion: evergreens to provide the structural bones of the beds year-round, deciduous and flowering shrubs to add texture, and perennials of varying heights that yield long-lasting color. About 50 percent of the foundation bed's space should be evergreens, 25 percent deciduous and flowering shrubs, and 25 percent perennials. But even then, a good plant can be placed in a bad spot. When you see that beautiful, blooming rhododendron at the garden center in a 2-gallon pot, you have to consider how big it will get over time before you plant it a foot from your house. Plan for at least 1 foot of space between the house and any mature plant to allow room for maintenance. This pushes the bed farther from the house, which is what most designers want, with front-of-the-house beds 6 to 8 feet deep. "This helps improve the view from inside, too," says Walters.


Lastly, designers agree that a restricted color palette helps give foundation plantings a considered, cohesive look. Too many colors distract the eye. When in doubt, use more plants with the same color or bloom instead of adding additional colors.


Shown: Spring-blooming shrubs brighten this scheme,

tall rhododendrons are placed nearest the house, shorter azaleas in front, with perennials and bulbs staggered in the foreground. For summer-to-fall interest, Hosta and Catmint start to stretch out as daffodils begin to fade.

Monday, March 26, 2012

Best Foundation Plants for Stellar Curb Appeal

There is something unsettlingly stark about the intersection where house meets land—it begs to be softened with greenery. But just hiding that juncture with a tight fringe of evergreens isn't the answer. Neither is a one-scheme-fits-all formula. Two conical things on either side of the front door with two tall things on either end of the house with lower things in the middle—that's a dated approach. The right foundation planting for most houses is a nice mix of evergreen and deciduous material, with dwarf varieties in order to keep window views open, some repetition of plants for a unified look, and an overall casual, naturalistic feeling.


Shown: Curved, asymmetrical beds hide open space under the porch and provide color and interest with a mix of flowering and evergreen plants. A mophead hydrangea greets visitors at the stairway with big orbs of color in the summer, while a blue juniper and a fine-leaved azalea anchor the bed in every season. Hanging baskets with trailing ivy soften the porch posts and frame the entry. Red flowers in the baskets echo the foundation planting's blooms.

Friday, March 23, 2012

Take the Work Out of Yard Work


You can reduce the time and money spent maintaining your lawn with simple acts, such as cutting your lawn at the appropriate height and using slow-release fertilizers. You can also realize large savings by changing your opinion about what constitutes a beautiful lawn. Clover, for example, is not an undesirable. A sprinkling of violets is quite beautiful. It is natural in mid-summer periods for your grass to turn temporarily brown. Remember, early lawns were inspired by grassy openings in the forest, not by golf courses or pictures in magazines.


Fertilizer Guidelines


North and South


The optimal time to apply fertilizers is when the grass roots and blades are actively growing. Apply fast-release fertilizers at a rate of 1 pound of nitrogen per 1,000 square feet. Slow-release fertilizers usually require a higher rate of application. Follow the manufacturer’s instructions; check the calibration of your spreader, as well as the square footage of your lawn, to ensure that you are applying the right amount. Remember, more is not necessarily better with fertilizers, applying too much may “burn” your lawn and promote thatch formation, disease, and insect infestation.


Keep in mind that well-watered lawns or those subject to heavy rainfall will require more nitrogen. Sandy soils are more prone to leach nutrients, but using water-insoluble fertilizers will help nutrients remain in the soil longer. Grass clippings left on the lawn over the course of a year will add about 1 pound of nitrogen per 1,000 square feet, so you can plan accordingly. The basic guidelines of fertilizing include:


Test soil to determine grade and amount of fertilizer to use.
Apply no more than 1-pound of fast-release nitrogen per 1,000-square feet in a single application.
Use slow-release nitrogen whenever possible, especially on sandy soils.
Use only the amount called for based on your lawn’s square footage.
Use a rotary spreader to apply quickly and evenly, and to avoid a striped pattern in the grass.
Spread the fertilizer in two directions for each application.
Apply fertilizer to dry grass, and water well immediately afterward.
Sweep up any fertilizer spilled on paved areas and save for later use.


Do not use leftover lawn fertilizer on trees, shrubs, annuals, or perennials. Too much nitrogen on these plants stimulates stem and leaf growth, decreases flower and fruit production, and sends an open invitation to chewing and sucking insects that feed on the nitrogen-rich foliage.


North


Growth season occurs during the early to mid fall, when weed competition is minimal, and fertilizing produces healthy roots. This timing also allows plants to build up on needed carbohydrate stores with just a moderate amount of top-growth. You should divide the annual amount of fertilizer and apply two-thirds in early fall and the remainder in mid to late spring, after the lawn’s initial green-up. For low-maintenance lawns, apply 2 pounds of nitrogen per 1,000 square feet. This may require an adjustment, given your specific growing environment, soil test results, the lawn’s condition, and the type of fertilizer you use. For example, Kentucky bluegrass and Perennial ryegrasses require more fertilizer than the fescues.


South


Southern lawns have a larger blade size, grow more vigorously, and need at least two applications of fertilizer each year. Do the first application about three weeks after the initial spring green-up; then fertilize again in late summer. Wait until warm-season grass becomes dormant before fertilizing areas overseeded for winter color. You can add supplemental quick-release nitrogen in between if there is weak growth and poor color. For low-maintenance lawns, apply 2 to 4 pounds per square foot. This may require adjustment depending on your specific growing environment, soil test results, the lawn’s condition, and whether you use a slow or fast-release type of fertilizer. For example, Bermudagrass, Zoysiagrass, and St. Augustinegrass need more fertilizer than Bahiagrass, Centipedegrass, or Carpetgrass.


Nitrogen Fertilizers


The nitrogen fertilizers listed below are commonly available at nurseries and garden centers:


Fast-Release

Ammonium nitrate
Ammonium phosphate
Ammonium sulfate
Calcium nitrate
Urea

Slow-Release


Activated sludge
Alfalfa meal
Bone meal
Composted manure
Dried poultry waste
IBDU (isobutylidene diurea)
Methylene urea
Soybean meal
Sulfur-coated urea
Ureaformaldehyde

Thursday, March 22, 2012

Aerating the Lawn in Preparation for Spring


Early March is a great time to think about scheduling your lawn aerating service for spring. Over the previous summer, the lawn will have been subjected to a lot of traffic, causing compaction. Soil compaction leads to a variety of other problems, if not alleviated, so it is best to alleviate compaction as early as possible in the year. Aerating will also take care of any thatch buildup problem your lawn might be suffering from. A little bit of thatch is fine. Too much thatch can lead to many of the same problems that soil compaction causes.


Why Spring for Aerating the Lawn?


Lawn aerating is helpful for the health of the grass, but it is also stressful because it disrupts the roots and the regular growing habit of the grass plant. Aerating in the spring, when the lawn is actively growing, gives the lawn a chance to recover more quickly than aerating during the summer or late fall when the lawn is not growing as quickly. If you didn't get a chance to aerate the lawn in the fall, the spring is, obviously, the next best choice! The spaces opened up by aeration will allow you to keep your lawn healthy all summer long. Air, water and fertilizer will penetrate the soil more easily after aeration, ensuring an overall healthier lawn.


Prevent these Problems with Spring Aeration


Aerating can help correct certain problems in the lawn, and avoid others. Take care of this garden task in the spring to avoid these problems:

Fungal diseases. Aeration won't completely eliminate these problems, but better air and water movement in the soil will reduce them.


Thatch buildup. An inch or so of thatch is ok. More than that, and you provide a home for fungal, bacterial and insect pests.


Weeds. Weeds sprout when lawn grass is unhealthy and unable to out-grow or out-compete the weeds. Overall improvement in health of the grass will keep weed problems to a minimum.


Steps for Successful Lawn Aerating


First, mow your lawn to about ½ of the normal mowing height. For example, if you usually mow your lawn to a height of three inches, set the deck at 1 ½ inches.


Give the lawn at least one inch of water a couple of days in a row, a couple of days before you aerate.


Aerate using a punch-core aerator. These actually remove little cores of soil.


After aeration, water to break up the cores of soil.


Top dress with a light layer of compost or lightweight topsoil.


Keep the lawn watered well-at least one inch a week-until it starts to fill in. Aerating is both helpful and stressful for the lawn, so good care after aeration is important.


You can RENT an aerator from IMPERIAL SERVICES to complete your lawn aerating. It should be a priority at least once a year.

Tuesday, March 20, 2012

Beauty Is Waiting In The Wings: Attracting Birds And Butterflies


(NAPSI)—Birds and butterflies add color and excitement to a garden that can’t be found from any other source. And their contributions are much more than aesthetic: Birds help control insects and slugs; while butterflies are important pollinators. Almost anywhere a plant grows will get an occasional visit from these attractive and beneficial creatures. Making your yard a welcoming oasis for them can be as simple as choosing the right plants.


Inviting Butterflies


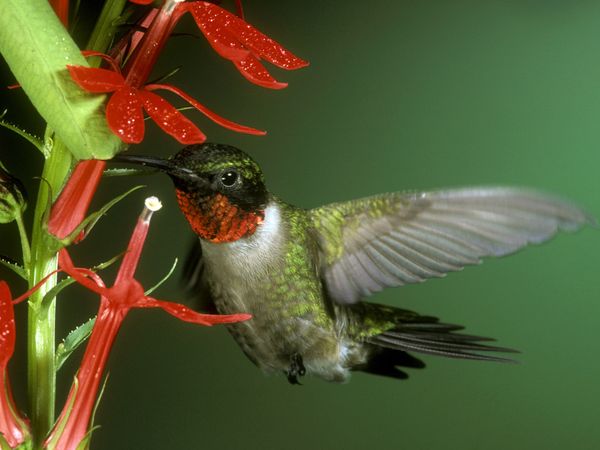
Butterflies and hummingbirds feed primarily on nectar, a sugary liquid produced inside flowers. Certain plants are exceptional sources of nectar, such as the aptly named butterfly bush (Buddleia), which is a favorite of hummingbirds as well.

Though these shrubs have long been popular, newly introduced varieties offer major improvements. For example, a Miss Molly butterfly bush has intense dark magenta flowers on a compact 4˜−5’ (1.2−1.5m) plant. If space is an issue, you may care to try the Lo and Behold series of butterfly bushes. These shrubs pack all the flower power and attractive silver foliage of their larger kin but in a neat, compact package: Blue Chip is just 24−30” (60−72cm) tall.

White butterfly bushes, such as Ice Chip, make an excellent choice for busy people who can only enjoy their gardens at night. The light-colored flowers appear to shine in the dark and at just 18−24” (45−60 cm) tall, it can be planted in a large pot or as an edging around a deck or patio.


Attracting Songbirds


Numerous species of much-loved songbirds, such as cardinals, cedar waxwings and bluebirds, rely on berries for food. Fortunately, several easy-to-grow landscape plants provide fruit for the birds and beauty for the gardener.

Winterberry holly, a native shrub, is an especially nice choice. Unlike other hollies, it loses its leaves in autumn, making the berry-laden stems extra showy. Some varieties are especially fruitful, such as Berry Heavy, while others are selected for exceptionally bright color, such as Berry Nice. Birds prefer the fruit of winterberry holly when it’s ripe and soft; consequently, the ornamental display remains until mid-winter.


Birds, Butterflies

and Lady Bugs


Certain plants are veritable bird- and butterfly-attracting powerhouses, providing both nectar-rich flowers and edible berries. Black Lace elderberry, for example, blooms in early summer with large clusters of pink flowers favored by a host of beneficial insects including lacewings and ladybugs. Once they have pollinated the plant, the resulting fruit is relished by a number of bird species; human garden visitors are equally fond of this shrub with its lacy dark purple leaves and attractive habit. It adapts readily to growing in a container, making it especially suitable for nature lovers with limited space.

Viburnum is another excellent option that provides nectar and fruit. There are many varieties available, but for maximum wildlife benefit, select one that bears abundant crops of fruit, such as the Blue Muffin with its dark blue berries, or Cardinal Candy with clusters of shiny red berries.

Shrubs provide excellent habitat for birds, as their much-branched interiors make lots of perches for building a nest and their foliage ensures good coverage to hide from predators. However, to keep the welcome mat out year-round, it is important to include some evergreen plants in every garden.

Varieties such as Soft Serve false cypress add graceful structure and rich color while providing a safe resting spot for feathered visitors, a service they’re sure to appreciate between the meals you’ve thoughtfully laid out for them.

Monday, March 19, 2012

New Fuel Treatment Protects Engines From Damaging Effects Of Ethanol Fuel Blends


(NAPSI)


The next time you start up your lawn mower, string trimmer or other equipment powered by a gas engine, think about adding a fuel preservative to protect your investment from the harmful effects of ethanol fuel blends.

According to engine experts, ethanol fuels begin to deteriorate almost the moment they are pumped, and can break down in the fuel tank causing rust, corrosion, buildup and even significant engine damage. This is particularly an issue in engines only used occasionally—like those on lawn mowers, generators and snow throwers, as well as engines powering sporting equipment such as boats, snowmobiles and ATVs.

A potent new fuel preservative, provides an easy and inexpensive way to prevent damage caused by ethanol-blended gas while also keeping the fuel fresh for up to three years.

The  formula fuel treatment & stabilizer protects any gas engine, including 2-cycle engines like those on trimmers, which use a blend of oil and gasoline. This protection may be more important than ever−ethanol-blended fuels now account for nearly 90 percent of all fuel sold in the U.S., according to the Renewable Fuels Association. The longer these blends sit in the fuel tank, the more damage they can do, resulting in starting issues, rough running and even severe engine damage.

“Ethanol-based fuels attract moisture, which eventually separates from the fuel, forming a layer of ethanol-enriched water at the bottom of the tank where it does its damage.

A Solution

Fuel Treatment & Stabilizer (in stock at Imperial Services, Billerica, MA) combines a proprietary “triple antioxidant” formula with other ingredients to fight water separation and protect the entire fuel system. Corrosion inhibitors form a protective barrier on metal parts while detergent ingredients help prevent gum and varnish buildup.

A metal deactivator works to stop the aggressive chemical reactions caused by dissolved metal ions in the fuel. The net result: extreme protection against fuel-related problems.

The company cautions consumers to avoid certain fuels altogether in small gas engines because of their damaging effects. These include fuels containing more than 10 percent ethanol (such as E15 or E85 gasoline) and gasoline containing other alcohol blends.


BROUGHT TO YOU BY : IMPERIALSERVICESINC.COM

Friday, March 16, 2012

Restoring a Tired Lawn


Restoring a tired lawn allows you to improve your lawn without removing the existing turf. You will have the best chance of success if you do a thorough walk-through of your lawn checking both above and below ground.


Your lawn is a good candidate for restoration if:


Some grass blades are thin or have a yellow/green look.
Turf cover is even with small areas of soil or wear.
Some bare soil is the result of water erosion, but there should not be standing water on the lawn.
Less than one half of your lawn is covered with weeds.
There are only minor bumps and depressions.
Grass roots are 3- to 6-inches long.
A spade penetrates easily to 3- or 4-inches.
There is at least one earthworm in a spade full of soil;
The thatch layer is no more than ½- to 1-½ inches thick


Soil top layer is 3- to 5-inches deep.
If conditions are worse than outlined above you will need to remove the turf, improve the soil, and replant.


The best time to begin restoration is late summer or early fall, although adjusting pH and dethatching can be done in the spring to prepare for a fall restoration. You will see some improvement in a restored lawn during the season in which you begin, but you will need two or three growing seasons to see dramatic progress.


While restoring your lawn is not nearly as labor intensive as removing all of your turf and starting over, it will require several weekends of work.


Eight Steps to Restoring a Lawn
It takes work, but it is not impossible to give your lawn a facelift. Follow these steps to help wake up a tired lawn:


Step 1: Remove thatch and weed buildup. The best time to dethatch is in the spring or fall when your lawn is thriving.


Step 2: Fill depressions and level bumps. As you dethatch your lawn (Step 1) make note of bumps and depressions and mark any irregularities with latex spray paint.


Step 3: Adjust your soil’s pH. Conduct soil tests and learn what to do to correct your soil’s pH level.


Step 4: Add nutrients. The results of Step 3 will determine how you fertilize your lawn.


Step 5: Increase organic matter and microbes. Fertilizer is not effective without an adequate population of microbes.


Step 6: Aerate compacted lawns. Aeration allows grass roots to deeply penetrate the soil and for fertilizer and organic matter to reach the roots.


Step 7: Prepare the surface and overseed it. Choose seed that is best for your area.


Step 8: Take care of young plants. All your work to this point will be in vain if you do not adequately care for the young grass plants. Click here for more details. It may take two or three growing seasons, but your hard work will eventually pay off in a beautiful lawn.

Wednesday, March 7, 2012

Turn Salvaged Junk Into Garden Ornaments

Add Character to Your Landscape Growing flowers isn't the only way to add color and interest to outdoor spaces. You can also personalize your green acres with character-filled items scavenged from flea markets, thrift shops, even your own garage. An old iron headboard, for instance, can stand in as a trellis for climbing vines. Mismatched interior doors can be hinged together to serve as walls for a movable open-air room. Read on for more creative ideas for turning vintage castoffs into garden ornaments. Here are 11 inspirational ideas to help see your old things in a brand new light.

Spring StakesHold top-heavy flowers, such as these zinnias, upright within the zigzagging springs of old metal patio furniture. Anything with spaces through which flowers can grow will work—even a wire basket with large mesh.
Herb Garden TrolleyCorral potted herbs in a worn wheelbarrow or wagon, such as this Radio Flyer, so that you can easily move them to catch the sun or sidle up to the BBQ.
Rustic EdgingRoot iron fence sections deep in the soil, as was done here, to provide a boundary for a patch of lilies. You can also create a border with fragments of an old stone cornice.
Metalwork Birdhouse
Welcome nesters with a handmade house. The spout on this oilcan makes a perfect perch. Another draw: a birdbath made from a salvaged pedestal sink.

Funnel Container
Chimney-Pot Pedestal

Flower Barrel
Buggy-Turned-Planting BoxUse a rusted wreck, like this broken-down carriage or a vintage tractor, as a focal point in the garden, drawing visitors to far corners that might otherwise go ignored. An old bicycle will also do the trick. Just sink its wheels halfway into the ground for stability and fill its market basket with herbs or flowers.

Window-Frame Trellis
Toy PlanterGive your kid's castoff a new life in the garden. Choose toys that'll weather well and ones with dirt-friendly containers, like this Tonka metal dump truck. Another idea: Use a tricycle seat as a pedestal for a box of blooms.


BROUGHT TO YOU BY: IMPERIALSERVICEINC.COM
Turn an old window that's missing its glass into a support for climbing vines. Here, a single sash is attached to an elevated planter made from scrap wood. As an alternative to a window, use a Windsor-style chair with vertical spindles in the backrest. Place potted plants on the seat and train tendrils around the spindles.
Turn an old open-top steel oil drum, preferably with a colorful painted finish like this one, into a handsome planter. Get it for free from your auto mechanic, and use a degreaser, such as Krud Kutter, to clean out the inside. Once all traces of oil are gone, you can also use drums to catch rainwater for garden irrigation.
Focus attention on a prized plant by placing it in the crown of a terra-cotta chimney pot, such as this salvaged octagonal one. You can also convert one to serve as a dramatic landscape uplight by placing it over a low-voltage fixture
Search the tool shed for shapely items to suspend from twine. Here, a metal funnel—a natural because it has built-in drainage—cradles a tuft of ornamental grass. Other good candidates for hanging planters are tin watering cans and loop-handle buckets. Drill small holes in the bottom and place pea gravel inside to keep soil from spilling out.

Monday, March 5, 2012

Design Ideas for Sheared Shrubs


It would be hard to keep a tidy year-round planting of perennials under the heavy shade of this rose arbor. A small pea-gravel pad edged with clipped boxwood solves the problem without detracting from the glorious blooms of the climbing 'Eden' rose above it. In late summer, when the rose stops blooming, the area becomes a restful green oasis with a more restrained, formal feeling. Use ball or square shaped hedges to mark the entrance to a path or frame a sight line.


Tip:
 The best hedging plants reliably make leaf buds on old wood, that is, on previous years' growth instead of sprouting only on new branches. This way, if you cut back older sections, new leaves will sprout readily. Boxwood (especially Buxus sempervirens), English holly, common myrtle, English laurel, copper beech, and Irish yew should also bud from the bottom to the top so that there is leaf coverage all the way up. Not all shrubs do this, so you tend to see the same hedging plants used again and again.


Use Low Borders to Direct Traffic
In the main garden, boxwood can mark a firm line between the lawn and the flowerbed’s, eliminating the need for decorative brick or metal edging. Repeating a variety of shapes keeps the plantings dynamic. Boxwood balls and rectangles punctuate the edging at consistent intervals. Treelike cones of clipped wax-leaved privet flank the entrance like columns. Consider placing sheared shrubs on either side of an arbor—or your front door—for a formal accent

 
Create Layers of Enclosure
In a small side garden, a low boxwood hedge forms a semicircle to highlight a statue, which is surrounded by fragrant lavender. You could do the same for a birdbath or other focal point. In the background, clipped plantings of tall, which add privacy by screening the security fence behind it.


TIP:

Time rejuvenation pruning to be least traumatic. In cold areas, spring is the best time to cut back formal hedges. That way plants can re-group, put on plenty of new growth from summer to fall, and be healthy enough to get through a harsh winter. Most plants tolerate surface shearing as needed over the course of the growing season. How often will depend on the type of plant used and the growing conditions.

 
Mix Plants for More Interest
Two or more kinds of plants can make sheared edging more varied and interesting. Cones of rosemary can mark the corners of a small rectangle of boxwood that sits on top of a masonry square. This three-part arrangement makes an attractive base, almost like a planter, for a sculptural crepe myrtle tree. In colder climates, dwarf Alberta spruce could be used in place of the tender rosemary plants.


Conceal the Shortcomings of Leggy Plants
This low hedge of boxwood makes a skirt that hides the unsightly bare bases of rosebushes. Because it provides a strong framework for the loose and romantic-looking beds, they can be filled with many kinds of roses and perennials—and maybe even a few weeds.


Tip:


Shape hedges so that the bottom is slightly wider than the top. Narrowing as you go from bottom to top keeps hedges fuller by allowing more sunlight to reach leaves. This prevents unattractive holes in the surface of the hedge and, worse, bare branches around the base. Though the difference may be barely perceptible, for a 10-foot-tall hedge the sides should slope as much as 4 to 6 inches from base to top. Some people set four posts and run level string lines along the top and bottom as guides to get a consistent shape.


Fill Out Problem Areas in the Yard


Brought to you by: Imperialservicesinc.com

Friday, March 2, 2012

Getting Rid of Gophers


Gophers are wily, destructive pests that throw up big mounds of earth willy-nilly across the landscape and destroy gardens and crops. Here's a quick overview of the remedies for these rodents, but check with your local extension service on specifics that suit your area.
First of all, stuffing things down a gopher hole, including hair or those so-called sonic repellents, just doesn't work. (Neither does dynamite, as Bill Murray proved in the movie Caddyshack.) I recommend box traps, which are the simplest and easiest type of gopher trap to use. You plant them in a main tunnel, which lies about 6 to 12 inches below the surface. (Find it by probing the ground around a mound on the side where you see a plug of fresh earth.) Then, following the illustrated directions, dig down and set two traps with their open ends facing opposite directions into the tunnel. No bait is needed, but be sure to wear gloves when setting the traps. You don't want your scent to scare them away.
If you prefer not to trap, stay away from the poisons that contain strychnine. A poisoned gopher eaten by a cat, dog, or fox will poison that animal as well. Safer poisons use a bait laced with anticoagulants; internal bleeding kills the gopher (painlessly, I'm told) without endangering other animals. Just be sure to follow instructions for its safe use and disposal.
I've read that gophers can't stand the smell of castor oil (can't say I blame them) and that spraying a diluted mix on the ground is enough to make them skedaddle. There's also some evidence that gophers don't like mulch, so you could try mulching a buffer area around plantings. Or you could encourage predators to come feast on your rich gopher supply — installing owl boxes in a nearby woods might be a good start.

BROUGHT TO YOU BY : IMPERIALSERVICESINC.COM