Wednesday, May 22, 2013

What’s in Your Gardening Shed?


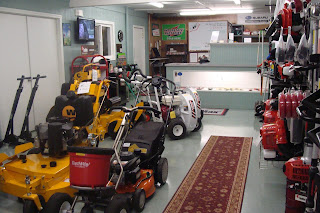
 Lawn Care Equipment

Your grass is healthy, green and thick as high pile carpet. But now the time has come to mow the lawn, edge the gardens and walkways, and trim the hedge. You know the lawn work needs to be done, but what lawn care equipment is available for you to use if you wish to implement green lawn mowing and maintenance? Before you spend hours at your local garden center, here are brief descriptions of standard lawn garden equipment.


Reel Mowers
A type of mower that uses blades on a revolving cylinder; it is powered by either engine or muscle These green lawn mowers make the healthiest, most even cut and is ideal for lawn mowing. Blades can be difficult to sharpen and should be brought to a professional

Rotary Mower
This achieves green lawn mowing by using flat horizontal blades controlled by an engine mounted on the mower deck Sharpening of the blades is a fairly simple and can be done by using a mill file and a rotary bench grinder. If not kept sharp, the blade will rip the grass instead of cutting it.


Walk Behind
Green lawn mowing at its best! The mower is powered by gas, electric, or by pushing the mower. They are environmentally friendly, require little maintenance and you get an extra workout every time you use it You need to be strong enough to push them.


Ride on Mower
Available in a array of sizes, styles and have a variety of add-ons for your convenience and ease of use; great for large yards Can be fitted for environmentally friendly engines or electric motors. They are expensive and heavier than other mowers which causes soil compaction


Additional lawn care equipment includes:

Ear & eye protection – Keep your eyes safe from dust or debris by weary safety goggles. For your ears, the National Institute if Deafness and Other Communication Disorders recommends that you protect your ears form sounds that are over 85 decibels—as the majority of trimmers and mowers exceed this number be sure you protect your ears.

No-spill gas cans – Help keep you, your family, and the environment safe and clean.

Watering utensils – hoses, rain gauges, sprinklers, etc.

Wheelbarrows – one of the simplest yet most useful pieces of lawn garden equipment

Rakes – A leaf rake, a metal rake, a bamboo rake and (optional) a landscaping rake


String trimmers
RedMax /EFCO trimmers include solid-steel drive shafts that are splined on both ends. This reduces vibration and improves acceleration, creating a much higher load-carrying capacity. The result is an efficient, low-friction, smooth-running machine that is comfortable to use. Solid-steel drive shaft systems deliver trouble-free operation with no maintenance and downtime when compared to flex-cable or flex-shaft units.

Now, it’s up to you—how will you decide what type of mower will work best? Use these quick guidelines for green lawn mower selection:
Powered or manual? If your yard is less than 2000 sq. ft., go manual.
Decide whether you want a mower with or without a bag for debris.
Determine whether a rotary blade or a reel mower will best suit your situation.
Lawn care equipment doesn’t have to be scary. Know what you want, take your time, then go out and hit the green!
brought to you by imperialservicesinc.com

Tuesday, May 7, 2013

Spring Lawn Care Tips


The calendar says it's spring, but the weather doesn't in many parts of the United States. It's still time to think about spring lawn care, though, even if it isn't time to actually do much spring lawn care. Here's what you should be 
thinking about in order to get your lawn off to a good start this spring.

Get out the Mower
Take your mower out of winter storage and prep it for spring use. Make sure that the blades are sharp, that there's fresh gasoline and fresh oil in the tanks and a clean or new air filter. You'll probably have to re-connect the spark plugs. (You might consider new spark plugs at this point.) If the mower needs any servicing, get it in to be looked at now before the shops get busy. (It could be too late for that in some areas!)

Clear the Lawn
If the grass has started growing again and you need to mow start by doing a walk around of the lawn and picking up any sticks, rocks, or other debris that might have fallen on the lawn during the winter. You don't want to dull your sharp new mower blade right off the bat! Also, running over rocks or twigs with the lawnmower can be dangerous.

Scout for Weeds
Were winter weeds a problem this year? Now is the time to remove them (before they go to seed) to prevent the same weeds from coming back next year. Use post-emergent herbicide or hand-dig any weeds that have taken over the lawn.

Overseed Thin Areas
Late March and early April are good times to overseed cool-season lawns to thicken thinning turf areas. Now is also a time to identify and repair damage from the winter.

Wait for the Lawn to Drain
Before bringing any heavy equipment onto the lawn, wait for it to drain. Mowing, walking on, or driving on a wet lawn can compact the soil, which will impair grass growth in the future.

Remember we here at Imperial Services have a Great RENTAL Department  for you!   

imperialservicesinc.com

Thursday, April 11, 2013

Smart Spring Yard Cleanup


It's Cleanup Season
March is notoriously unpredictable. Shrubs can be crusty with snow on the first of the month, and then, a couple of weeks later, temperatures can warm up enough for flower and leaf buds to show signs of life.
Still, some early spring cleanup tasks are sure things this time of year. So go ahead and remove burlap from trees and shrubs as the weather warms. Prune away winter-killed branches to make room for new growth. Cut back spent perennials and pull up old annuals if you didn't get around to it last fall. Then look around. March is a good time to take stock of your yard and see if it's time to thin out crowded beds and do some transplanting to fill in bare spots.

1. Prune away dead and damaged branches. 

Where tree or shrub branches have been damaged by cold, snow, and wind, prune back to live stems; use a handsaw for any larger than ½ inch in diameter. Shaping hedges with hand pruners, rather than electric shears, prevents a thick outer layer of growth that prohibits sunlight and air from reaching the shrub's center. At right, Roger neatens up a yew by pruning wayward shoots back to an intersecting branch. Prune summer-flowering shrubs, such as Rose of Sharon, before buds swell, but wait to prune spring bloomers, like forsythia, until after they flower.
Trim overgrown evergreens back to a branch whose direction you want to encourage.

2. Cut back and divide perennials as needed.

Prune flowering perennials to a height of 4–5 inches and ornamental grasses to 2–3 inches to allow new growth to shoot up. Where soil has thawed, dig up perennials, such as daylilies and hostas, to thin crowded beds; divide them, leaving at least three stems per clump, and transplant them to fill in sparse areas. Cut back winter-damaged rose canes to 1 inch below the blackened area. On climbers, keep younger green canes and remove older woody ones; neaten them up by bending the canes horizontally and tipping the buds downward. Use jute twine or gentle Velcro fasteners to hold the canes in place.
A pair of sharp bypass pruners makes a clean cut on both dead and living foliage.

3. Clean Up Around Plants.

Rake out fallen leaves and dead foliage (which can smother plants and foster disease), pull up spent annuals, and toss in a wheelbarrow with other organic yard waste. Once the threat of frost has passed, Roger also removes existing mulch to set the stage for a new layer once spring planting is done. Push heaved plants back into flower beds and borders, tamping them down around the base with your foot, or use a shovel to replant them. Now is a good time to spread a pelletized fertilizer tailored to existing plantings on the soil's surface so that spring rains can carry it to the roots. Add a 5-10-10 fertilizer around bulbs as soon as they flower to maximize bloom time and feed next season's growth. Use pins to fasten drip irrigation lines that have come loose and a square-head shovel to give beds a clean edge and keep turf grass from growing into them.

4. Prep Damaged Lawn Areas for Spring Seeding.

In colder climates grass starts growing in April, but early spring is a good time to test the soil's pH so that you can assemble the right amendments. Remove turf damaged by salt, plows, or disease to prepare for the seeding that should follow in a few weeks. Work in a ½-inch layer of compost to keep the new seed moist, increasing the germination rate. Begin seeding once forsythia starts blooming in your area. In warmer climates, March is a good time to add the first dose of fertilizer and crabgrass treatment.

Remove dead turf with a square metal rake, then flip it over to spread compost.
Don’t forget to prepare the lawn with an aerator.  We have them for rent here at Imperial Services Inc.

Tuesday, April 2, 2013

3 STEPS TO STARTING A SUCCESSFUL LAWN MOWING BUSINESS


Mowing grass for your neighbors is one thing, but actually starting your own lawn mowing business can seem like a daunting task. The reality is this: starting your own business is not difficult if you have the drive and do the research. Today we’re going to discuss the first vital steps to getting a business off the ground.

1. Drive and Research

Trying to start a business without drive and discipline is like trying to drive on an interstate highway with flat tires. You’ll end up going nowhere. The greatest factor that dooms businesses is not financial crisis or lack of capital; it’s equivocation and laziness.  Personal discipline is the most important initial step towards launching a new business.

Do the research. Think through every detail involving starting a business. Where will you get capital? What equipment do you need? Will you need to rent a space to store equipment and start the business? How can my business be found on the internet? Will I have employees? How will you generate leads for clients? Have the discipline to ask the hard questions and use all of the resources available to you to get the answers. The internet offers many helpful sources, ranging from ratings of lawn equipment to applying for a business loan. It helps to make a daily or weekly research schedule to keep your efforts on track.

2.  Capital

Gaining capital through pitching ideas to investors is becoming a thing of the past. New companies are often forced to find capital through other means. What if you don’t have your own money to start a business? What should you do?

The first step is to identify which type of capital you need to start, which for almost every new business is either Seed Capital or Start-up Capital. Seed Capital is funding for planning and research, whereas Start-up Capital funds equipment, supplies, and rent. Start-up Capital is particularly important for the first two years of a small business and it’s potential growth. When a business survives and begins to grow it will shift to Mezzanine Capital, which is also known as Expansion Capital.

Capital can come from investors, but most often it comes through the form of a business loan. When applying for a loan, think specifically about what the loan will be used for and the duration of the loan itself. Take time to think about how to sync up the funds of the loan with things you plan to use the loan money for.


3.  Equipment

A cost-effective business is a sustainable business. A smart investment when starting a lawn mowing business is buying quality equipment. Sounds simple, right? Think about cost this way: A lot of capital is tied up in fuel, rent, and hired hands. Equipment failure or malfunction is an unexpected added cost. Therefore, when purchasing equipment, the paramount element should be return on investment. Based on operating costs, equipment repair costs lead to a poor return on investment and can quickly place your business financially in the red. Study equipment manufacturing and equipment reviews before making any purchases, as the right equipment purchase will lead to a much greater investment return over time. We can help with any questions you have here at Imperial Services. There are also options of Free Financing with some of the larger equipment you might want to purchase.

Give yourself due diligence when considering starting a new company. Do the research and do your best to answer all the hard questions. Remember, if you have the passion and the drive, you can start your own business and make it successful.

For more information about our line of commercial mowers, contact your local Wright dealership today. IMPERIAL SERVICES INC.

Thursday, March 7, 2013

Seven Secrets For A Beautiful, Low-Maintenance Landscape


Seven Secrets For A Beautiful, Low-Maintenance Landscape


(NAPSI)—Anyone who thinks a low-maintenance landscape has to be plain green and ugly should think again. With a bit of planning, some smart plant choices and the help of these seven garden designer secrets, you can have a yard that’s the envy of your neighborhood—and enough time to enjoy it.

1. Choose plants that will flourish given the realities of your yard. Some plants like full sun while others tolerate shade; some don’t mind freezing temperatures while others are unfazed by relentless heat. Selecting plants that thrive in the existing conditions of your site ensures a healthy, attractive landscape. Observe the light levels around your home—six to eight hours plus of uninterrupted sun each day indicates full sun, four to six hours is considered part shade or part sun, and less than four hours would be a shaded site. Plants at the garden center should have tags that tell you their light preferences. Shopping locally helps ensure that all the plants you see will be suitable for the climate in your yard.

2. Plant drought-tolerant shrubs. These specially adapted plants thrive with limited water once they are established (usually after their first season in the ground). Drought-tolerant plants sail through hot summer days easily, saving you the time and money it takes to water the landscape. Read the tag attached to the shrub for information on its drought tolerance or look for visual cues such as silvery-grey leaves, as are found on Petit Bleu caryopteris, and narrow, needlelike foliage, as on Fine Line rhamnus. 

3. Spare yourself the time it takes to prune your plants by opting for compact varieties. Compact (also known as dwarf) plants never get too large for the space where you’ve planted them so you don’t have to bother with confusing pruning instructions. Most people’s favorite plants are available in compact, no-prune varieties: hydrangea lovers can try Little Lime or Bobo dwarf-panicle hydrangeas or the tidy Cityline series of big-leaf hydrangea. Rose fans should take note of the low-growing Oso Easy series with its range of 10 vivid colors, all under 3’ high. Even butterfly bush, a shrub notorious for its giant, sprawling habit, is available in a compact 2’ height with the innovative Lo & Behold series. 

4. Choose plants with high-quality, attractive foliage. These look great even when not in bloom, beautifying your landscape for months instead of just a few weeks. Colorful foliage, including the dark purple of Black Lace elderberry or the cheery gold of Chardonnay Pearls deutzia, and variegated foliage, such as My Monet weigela or Sugar Tip hibiscus, make engaging focal points from early spring through late fall. Mix them with such evergreens as Castle Spire holly and Soft Serve false cypress for year-round color.

5. Plant in masses of three, five or seven of the same kind of plant. This gives your landscape a cohesive, professionally designed appearance. Plus, weeds cannot grow if desirable plants are already taking up the space, eliminating that notoriously tiresome garden chore. Planting in groups of odd numbers is a designer’s secret for a bold statement that doesn’t feel too formal or fussy.

6. Mulch. A two- to three-inch-thick layer of shredded bark mulch not only gives your landscape a pleasing, finished look, it conserves water by reducing evaporation. It also keeps plant roots cool and shaded, allowing for healthy, vigorous growth that resists pests and diseases naturally. 

7. Don’t be afraid to replace the plants that take too much of your time, or those that you don’t really like, with new, easy-to-grow shrubs. There are so many improved varieties available now that there is little reason to settle for anything else. 
Here at Imperial Services we have the equipment to clear away the weeds and aerate the yard to edge the beds and to blow away the debris!

Thursday, February 28, 2013

Mowing Tips For A Great-Looking Lawn


Mowing Tips For A Great-Looking Lawn

The grass can be greener on your side of the fence if you heed these eight hints on making the most of mowing.

1. Choose the Correct Cutting Height: 
This depends on the type of grass, the amount of rainfall, prevailing temperature and the lawn’s overall condition.

2. Don’t Cut Your Grass Too Short: 

Mowing too short can result in weak, thin grass that’s easily damaged by drought and pests. Leaving your grass a bit longer reduces heat buildup and preserves needed moisture. A good rule of thumb is the one-third rule—cut no more than a third of the grass height and never more than an inch at a time.

3. Mow With Sharp Blades: 
Sharp blade’s cut grass cleanly and efficiently; dull blades tear at the grass, harming it. We Sharpen Blades here at Imperial Services.

4. Mow When the Grass Is Cool and Dry: 
Late afternoon or early evening often provides ideal mowing conditions. Don’t mow after rain or even heavy dew and never mulch when the grass is wet. Moist grass can clump beneath the mower deck.

5. Water Your Lawn Regularly: 
Try to imitate a slow, soaking rain by applying about an inch of water per week. Consider placing tin cans around your lawn, so you can check to be sure you are giving it the proper amount of water.

6. Use the Right Amount of Fertilizer: 
A slow-release fertilizer provides missing nutrients for slow, even growth. When to fertilize and how much to use depends on the condition of your lawn and soil. 

7. Aerate in the Spring: 
Using an aerator to remove cores of soil from the lawn increases clipping decomposition speed and encourages deeper root growth by opening up the soil and permitting greater movement of water, fertilizer and air.
Here at Imperial Services we have an Aerator that you can rent, by the hour, day or week. Just give us a call  @ 978-67-6016.

8. Select the Right Mower: 
The right mower for your lawn depends on the size of the property, whether there are hills and whether you want it to help with other chores, such as pulling a cart for yard work. Once you have your answer, you can decide among a walk-behind mower, a rider tractor or a zero-turn machine. Get advice from the experts on lawn care at Imperial Services Inc.

Thursday, February 21, 2013

Maintain Your Snow Blower


Learn how to correctly service, clean and care for your snow blower to extend its life and improve efficiency. Proper storage of your snow blower in the off-season will also ensure you get the most out of your blower year after year.
• Check the oil level before each use and add as needed.
• Check the fuel level before each use.
• Check shear pins and other bolts frequently for proper tightness.
• Change the spark plug every 100 hours or once a season.
• Check snow-blower shave plates and skid shoes for wear and damage; replace as needed.
• After use, run the auger on a dry surface for a few moments to eliminate moisture on the unit and to prevent freeze-up of the auger / impeller.
• Check tire pressure.

Service the Rubber Auger
These rubber paddles will eventually need replacement because they wear out over time. Their service life will depend on variables, such as use, adjustments, maintenance and operating surface. Rubber paddles should be replaced when they're damaged or worn out. They may also need to be replaced if the unit is improperly discharging snow forward instead of through the chute.

Clear a Clogged Discharge Chute
Hand contact with the rotating impeller inside the discharge chute is the most common cause of injury associated with snow blowers. Never use your hand to clean out the discharge chute.

To clear the chute:
Shut the engine off.
Wait 10 seconds and ensure the impeller blades have stopped rotating.
Always use a clean-out toll, not your hands.

Properly Adjust Skid Shoes
Adjusting the skid shoes on a two-stage snow blower allows you to determine how close to the ground the unit will clear snow.


http://www.imperialservicesinc.com/


If you're clearing an even and solid surface, you can adjust the skid shoes as follows:

TIP: 
The auger housing needs support during this adjustment. Find something that might be equal to or close to 1/8 of an inch thick (a piece of wood, a couple of sections of newspaper, sheet(s) of cardboard). Make sure the width is less than that of your snow blower. To properly support your unit for this adjustment, don't use anything that's fragile or unstable.

Place the supporting device underneath the center of the shave plate below the auger housing. This support should then elevate the sides of the auger housing slightly.
Now loosen the hardware, securing the skid shoes on both sides of the auger housing, slide the shoes until they're even with the ground, and then tighten the shoe hardware.
If you remove the support material, you should find that your shave plate is positioned just slightly above the ground with the shoes properly supporting the entire auger housing.

Special Irregular Surface Adjustment:
 If you're are clearing a surface that has an unusually irregular surface, such as gravel or cobblestone, you should follow the instructions above, but you should use something much thicker than 1/8 of an inch for support during the adjustment. The actual thickness needed depends on the severity of the surface or the size of stones covering the surface. For example, if you have stones that are as large as a 1/2 inch in diameter, use something close to 3/4 of an inch in thickness for this support.

***Before performing maintenance on any unit, always disconnect and ground the spark plug wire.